Posted on Leave a comment

Equine First Aid: Bandaging Strategies for Horse Wounds

Equine First Aid: Bandaging Strategies for Horse Wounds

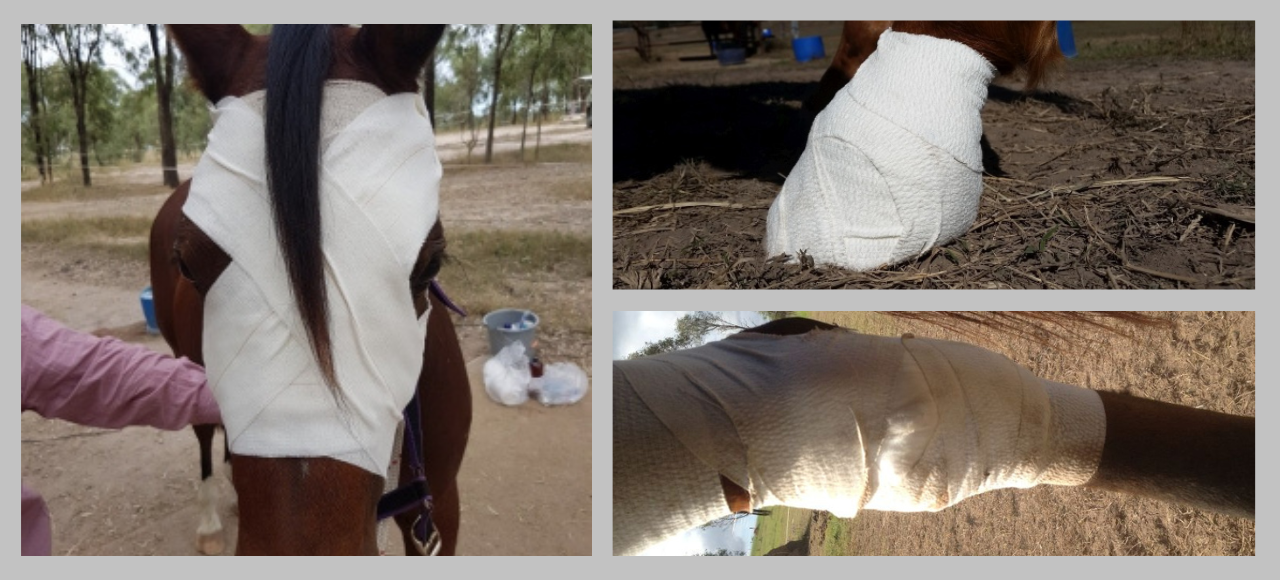
Correct Bandaging is one of the most important parts of wound management. Too tight and the circulation is compromised. Too loose and the bandage falls down and doesn’t provide the protection it needs to. 

Guide to Proper Bandaging

  • If the wound is between the knee and the fetlock, make sure to bandage the full leg between the joints to minimise potential swelling as blood will tend to pool above the fetlock joint if there is bruising that slows circulation or if horses movement is restricted. Vet Wrap is the perfect bandage to use for these situations. 
  • Bandaging below the fetlock to the coronet needs an adhesive bandage to keep it in place, otherwise it will ride up and sit around the fetlock. Light Rip is ideal for this area as it has elastic to provide firmness without being too tight, yet can be stuck to the hair or hoof to keep it from moving. The adhesive in Light Rip is a medium level that means it stays put, but will come off easily when pulled and doesn’t pull the hair out. 
  • For wounds around joints such as knee or hock, you may use a combination of Vet Wrap for the main wrapping over padding and Light Rip at top and bottom to help hold in place. Other times, just using the Light Rip will be appropriate, where the additional stickiness, without too much pressure is required.
  • For maximum support, where you want the bandage to stay in place for a longer time and need full support without stretch, then Elastoplast is ideal. Just remember that the adhesive in it is meant to stay attached, so only put a small amount over the edge of the padding to stick to the hair, as you won’t get it off without ripping hair out.

Please note:

If you are wrapping with any pressure make sure there is adequate padding under the bandage so that circulation is not affected. Leave a little padding out the top and bottom of the bandage so the edges don’t dig in and have a tourniquet effect.

CONCLUSION

In conclusion, mastering bandaging techniques is a vital skill for every horse owner when it comes to equine first aid. Properly bandaging horse wounds can aid in their healing process. It can also prevent complications, and ensure the well-being of our equine companions. 
Posted on Leave a comment

Equine First Aid: Handling Level 3 Wounds in Horses

Equine First Aid: Handling Level 3 Wounds in Horses

In the intricate world of equine health, injuries and wounds are unfortunate yet inevitable aspects of a horse’s life. Among the various types of wounds, Level 3 wounds stand out as significant challenges, demanding careful attention, prompt intervention, and specialized care. 

Recognizing the gravity of these wounds is crucial for horse owners, caretakers, and equine health professionals, as the timely and appropriate response can significantly impact the healing process and long-term well-being of the horse.

This article serves as a guide in recognizing and effectively managing Level 3 wounds in horses.

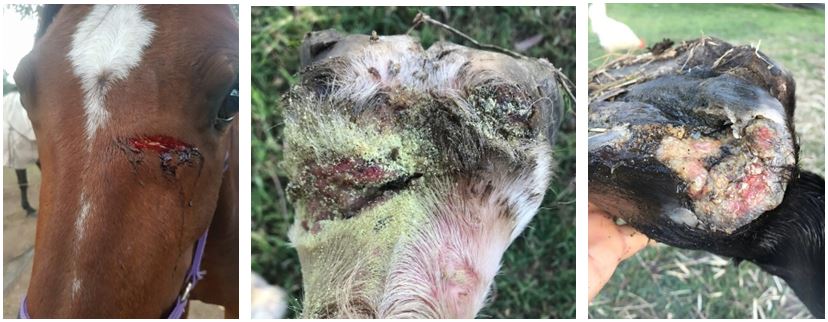
Key Signs in Identifying Level 3 Wounds in Horses

  1. Depth of the Wound
  2. Visible Tissue Damage
  3. Excessive Bleeding
  4. Pain and Discomfort
  5. Abnormal Swelling
  6. Altered Range of Motion
  7. Visible Foreign Objects
  8. Changes in Behavior
  9. Foul Odor

First Aid Techniques

  1. If the wound is large enough to require bandaging, or needs protection from flies while it heals, apply Golden Honey Healing Ointment, cover the area to be bandaged with cotton wool / gauze padding and then bandage with Vet Wrap, Light Rip or Elastoplast.
  2. Generally if you’ve got to the wound quickly and done a good job of cleaning and bandaging, then it’s better to leave the bandage in place for 2-3 days at a time to give it time to work on the healing process undisturbed.
  3. To maximise the healing process, wash the wound with Colloidal Silver, not water, when changing the bandage.
  4. Make sure to check the bandages twice daily though and if they’ve slipped at all take them off and redo them. 
  5. Check regularly how the wound smells as this is a good indicator of whether it’s healing well, or needs attention. If it smells bad, then remove the bandage immediately, check for any reason for the smell such as debris not removed properly, clean the wound and reapply dressing.
  6. Colloidal Silver is good to add to their feed while they are mending as it helps to raise their immunity, and acts as an antibacterial booster. 60- 100 ml twice per day in their feed will help promote the healing and reduce infection.

Deeper cuts may require vet attention for debriding (cleaning the surface of dead tissue) or stitching prior to ointment application and bandaging. If you have any concerns with the wound, if it’s a puncture wound near a joint, or if it smells bad, then definitely call your vet. 

CONCLUSION

In conclusion, properly handling Level 3 wounds in horses is crucial for their well-being and recovery. By following the steps outlined in this article, horse owners and caretakers can effectively address these serious injuries with confidence and care. Remember to stay calm, assess the situation thoroughly, and seek professional veterinary assistance when necessary. With the right knowledge and preparation, you can provide your horse with the best possible first aid treatment in times of need. 

Posted on Leave a comment

Proven First Aid Techniques for Treating Horse Bites and Stings

Proven First Aid Techniques for Treating Horse Bites and Stings

Whether you’re an experienced equestrian or a casual horse enthusiast, it’s crucial to be prepared for unexpected incidents such as bites and stings. Fear not! In this article, we will explore some proven first aid techniques for treating horse bites and stings. It’s essential to know how to handle such situations effectively. So saddle up and get ready to learn how to provide immediate relief for both you and your equine companion!

FIRST-AID TREATMENT

         1. Apple Cider Vinegar (dilute quarter of a cup in 1 litre of water for a soothing external wash)  

If the skin is unbroken, then a wash with ACV will help to cool the area and take out soreness and stinging. 

         2. Apis homeopathic drops (for insect bites and stings)  

Apis homeopathics provide soothing relief for swelling, oedema, burning & stinging pains. Use for insect bites and stings. Apis Mel is from Honey Bees and is a perfect match for clearing the itching and swelling of insect bites, bee stings, wasp, hornet, mosquito, and other flying insects.

Put a few drops of Apis onto the area that is swollen, and a dropper full onto the horse’s tongue. 

       3. Antihistamine, eg. Polaramine 

For extreme swelling, where the horse has been bitten multiple times then you may need an antihistamine to reduce the allergic reaction. If you have antihistamines from your vet, then use them. We’ve had good results from giving Polaramine or Telfast when vet supplied antihistamines are not available.

A full size adult horse will normally respond quite well to double a human dose, with reduction in the swelling obvious within 1-2 hours if it’s going to work. Can be followed up with an additional dose in 6-12 hours (depending on the strength given) if deemed necessary. 

Make sure to inspect the horse thoroughly for ticks, and remove, particularly if the swelling is under the belly or in the groin area.

CONCLUSION

In conclusion, while horse bites and stings can be painful and alarming, there are several proven first aid techniques that can help alleviate the discomfort and promote healing. However, it is always important to seek professional medical advice if the symptoms persist or worsen. By following these techniques and taking prompt action, you can ensure the safety and well-being of both yourself and your horse.

Posted on Leave a comment

Combat Bruising and Swelling with These Proven First-Aid Strategies!

Combat Bruising and Swelling with These Proven First-Aid Strategies!

Bruising and swelling are common ailments that can be caused by a variety of factors. Good thing is there are several first-aid strategies you can try to combat these issues and help your horse feel better.

In this article, we’ll discuss some effective ways to treat bruises and swelling in horses using items you may already have on hand. From ice packs to natural remedies, we’ve got you covered with easy-to-implement solutions that will have your horse back on his feet in no time! So let’s delve into the world of equine first aid and get your four-legged friend back to his best self.

First-Aid Strategies for Bruising and Swelling

If the skin is unbroken, then a wash with Apple Cider Vinegar will help to cool the area and take out soreness and bruising. Icing the area can also help with reducing the swelling. 

Note: For Apple Cider Vinegar (ACV), dilute quarter of a cup in 1 litre of water for a soothing external wash.

If the swelling is from possible infection, then wetting the area thoroughly with Colloidal Silver can help with reducing the infection as well as the swelling.

Arnica is brilliant to follow up with as it is an anti-inflammatory and pain relieving agent. It helps disperse the blood from the area, reduces the pain, and promotes circulation. A dropper of liquid in the mouth, and or drops / ointment on the area. 

If the knock has been on a bony area then using comfrey ointment can help stimulate repair of the bones, and reduce the bone bruising. 

CONCLUSION:

In conclusion, as horse owners, we cannot avoid the risk of our horses getting injured. But, we can take measures to reduce the severity of bruising and swelling when an injury occurs. By implementing these first-aid strategies, we can help our equine friends heal faster and more comfortably.

Image by khamkhor from Pixabay